【Django】OpenCVとyieldを使い、ウェブカメラの映像をライブ配信する【imutils.video.VideoStreamer】

Djangoで、VideoStreamerで撮影した映像をライブ配信させる。
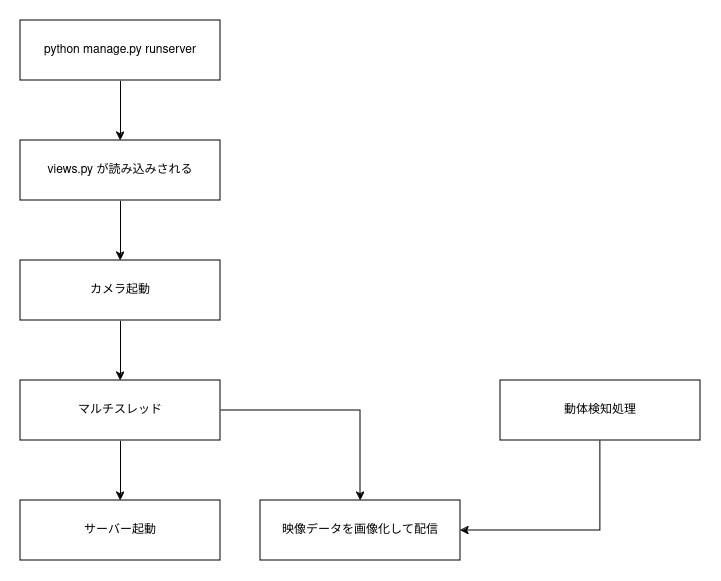
仕組みはyieldとマルチスレッド処理を使い、サーバー起動とライブ配信処理を並行して行っている。
撮影して画像を保存しAjaxのポーリングを繰り返すより、Django側がカメラの映像を配信し続ける本記事の方法が効率が良い。
必要なライブラリ
asgiref==3.8.1
Django==5.0.6
imutils==0.5.4
numpy==1.26.4
opencv-contrib-python==4.9.0.80
sqlparse==0.5.0
typing_extensions==4.12.0
views.py
配信処理のビューとカメラの起動を行っている。
動体検知処理の部分はコメントアウトしている(無くてもライブ配信は成立するため)
from django.shortcuts import render,redirect

from django.views import View
from .models import Topic

class IndexView(View):

    def get(self, request, *args, **kwargs):

        topics  = Topic.objects.all()
        context = { "topics":topics }

        return render(request,"bbs/index.html",context)

    def post(self, request, *args, **kwargs):

        posted  = Topic( comment = request.POST["comment"] )
        posted.save()

        return redirect("bbs:index")

index   = IndexView.as_view()

from .detector import SingleMotionDetector
from imutils.video import VideoStream
from django.http import StreamingHttpResponse

import threading
import time
import datetime
import imutils
import cv2

# 最新のフレームが入る変数
outputFrame     = None

# スレッド間でのフレームの読み書きを制御するためのロック
lock            = threading.Lock()

# カメラを起動させる(このカメラの起動を任意のタイミングにすることで、使っていないときはOFFにできるのでは?)
vs              = VideoStream(src=0).start()
time.sleep(2.0)

# カメラからフレームを読み取り、動体検知処理をする
def detect_motion(frameCount):
    global vs, outputFrame, lock

    # 動体検知処理を動かす
    #md      = SingleMotionDetector(accumWeight=0.1)
    #total   = 0

    while True:

        # カメラを読み込みして、リサイズする。
        frame       = vs.read()
        frame       = imutils.resize(frame, width=400)

        # グレースケールとぼかしを掛ける(動体検知の高速化)
        #gray        = cv2.cvtColor(frame, cv2.COLOR_BGR2GRAY)
        #gray        = cv2.GaussianBlur(gray, (7, 7), 0)

        # 現在の時刻を表示している
        #timestamp   = datetime.datetime.now()
        #cv2.putText(frame, timestamp.strftime("%A %d %B %Y %I:%M:%S%p"), (10, frame.shape[0] - 10),cv2.FONT_HERSHEY_SIMPLEX, 0.35, (0, 0, 255), 1)

        # ここで囲みをつけている
        """
        if total > frameCount:
            motion = md.detect(gray)
            if motion is not None:
                (thresh, (minX, minY, maxX, maxY)) = motion
                cv2.rectangle(frame, (minX, minY), (maxX, maxY),(0, 0, 255), 2)
        """

        # 動体検知機にフレームを更新する
        #md.update(gray)

        #total += 1
        with lock:
            # 最新のフレームをコピーする
            outputFrame = frame.copy()


# 最新のフレームをjpgに変換して返却している
def generate():
    global outputFrame, lock
    while True:
        with lock:
            if outputFrame is None:
                continue
            (flag, encodedImage) = cv2.imencode(".jpg", outputFrame)
            if not flag:
                continue

        # yield the output frame in the byte format
        yield(b'--frame\r\n' b'Content-Type: image/jpeg\r\n\r\n' + bytearray(encodedImage) + b'\r\n')


# jpgデータを配信している
class StreamView(View):
    def get(self, request, *args, **kwargs):
        return StreamingHttpResponse(generate(), content_type="multipart/x-mixed-replace; boundary=frame")


# サーバー稼働とストリーミング配信処理を並列に実行する
t           = threading.Thread(target=detect_motion, args=(32,))
t.daemon    = True
t.start()

stream   = StreamView.as_view()
detection.py
途中で呼び出されている、動体検知処理の部分。この部分はライブ配信には影響はしない。
# import the necessary packages
import numpy as np
import imutils
import cv2

# 動体検知処理をするクラス
class SingleMotionDetector:

	def __init__(self, accumWeight=0.5):
		# store the accumulated weight factor
		self.accumWeight = accumWeight
		# initialize the background model
		self.bg = None

	def update(self, image):
		# if the background model is None, initialize it
		if self.bg is None:
			self.bg = image.copy().astype("float")
			return
		# update the background model by accumulating the weighted
		# average
		cv2.accumulateWeighted(image, self.bg, self.accumWeight)


	def detect(self, image, tVal=25):
		# compute the absolute difference between the background model
		# and the image passed in, then threshold the delta image
		delta = cv2.absdiff(self.bg.astype("uint8"), image)
		thresh = cv2.threshold(delta, tVal, 255, cv2.THRESH_BINARY)[1]
		# perform a series of erosions and dilations to remove small
		# blobs
		thresh = cv2.erode(thresh, None, iterations=2)
		thresh = cv2.dilate(thresh, None, iterations=2)

		# find contours in the thresholded image and initialize the
		# minimum and maximum bounding box regions for motion
		cnts = cv2.findContours(thresh.copy(), cv2.RETR_EXTERNAL,
			cv2.CHAIN_APPROX_SIMPLE)
		cnts = imutils.grab_contours(cnts)
		(minX, minY) = (np.inf, np.inf)
		(maxX, maxY) = (-np.inf, -np.inf)

		# if no contours were found, return None
		if len(cnts) == 0:
			return None

		# otherwise, loop over the contours
		for c in cnts:
			# compute the bounding box of the contour and use it to
			# update the minimum and maximum bounding box regions
			(x, y, w, h) = cv2.boundingRect(c)
			(minX, minY) = (min(minX, x), min(minY, y))
			(maxX, maxY) = (max(maxX, x + w), max(maxY, y + h))
		# otherwise, return a tuple of the thresholded image along
		# with bounding box
		return (thresh, (minX, minY, maxX, maxY))
処理の流れ
現状の課題
動体検知処理を動かすと、CPU使用率80%を超える。(Corei5 8500にて、動体検知なしの場合は50%)
また、サイトにアクセスしていない場合でも、カメラは動き続ける。
リソースを削減するには、カメラをON、OFFにする仕組みが別途必要になる。
【Django】任意のタイミングでサーバーのカメラでライブ配信する【imutils.video.VideoStreamer】
しかし、映像のラグはほとんどない。
ソースコード
https://github.com/seiya0723/django_livestreamer
参照元
https://pyimagesearch.com/2019/09/02/opencv-stream-video-to-web-browser-html-page/