DjangoでカレンダーのUIを作る

『Djangoビギナーが40分で掲示板アプリを作る方法』を元に、カレンダーのUIを作る。
1ヶ月分のデータをまとめて表示させたい系のウェブアプリの作成に活用できる。
calendar.py
このcalendar.pyをアプリディレクトリ内に作る。
import datetime
def create_calendar(year,month):
#今月の初日を指定
dt = datetime.date(year,month,1)
#calendarはweekのリスト、weekは日付のリスト
calendar = []
week = []
#月始めが日曜日以外の場合、空欄を追加する。
if dt.weekday() != 6:
week = [ {"day":""} for i in range(dt.weekday()+1) ]
"""
#内包表記を使いたくない場合はこちら
for i in range(dt.weekday()+1):
week.append({"day":""})
"""
#1日ずつ追加して月が変わったらループ終了
while True:
week.append({"day":dt.day})
dt += datetime.timedelta(days=1)
#週末になるたびに追加する。
if dt.weekday() == 6:
calendar.append(week)
week = []
#月が変わったら終了
if month != dt.month:
#一ヶ月の最終週を追加する。
if dt.weekday() != 6:
#最終週の空白を追加
for i in range(6-dt.weekday()):
week.append({"day":""})
calendar.append(week)
break
return calendar
#最終的に作られるcalendarのイメージ。
"""
[ [ {'day':'' }, {'day':'' }, {'day':'1' }, {'day':'2' }, {'day': '3' }, {'day':'4' }, {'day': '5' } ],
[ {'day':'6' }, {'day':'7' }, {'day':'8' }, {'day':'9' }, {'day': '10'}, {'day':'11'}, {'day': '12'} ],
[ {'day':'13'}, {'day':'14'}, {'day':'15'}, {'day':'16'}, {'day': '17'}, {'day':'18'}, {'day': '19'} ],
[ {'day':'20'}, {'day':'21'}, {'day':'22'}, {'day':'23'}, {'day': '24'}, {'day':'25'}, {'day': '26'} ],
[ {'day':'27'}, {'day':'28'}, {'day':'29'}, {'day':'30'} ]
]
"""
使い方
ビューはcalendar.pyをimportして、実行する。
from django.shortcuts import render,redirect
from django.views import View
from .models import Topic
from . import calendar
import datetime
class IndexView(View):
def get(self, request, *args, **kwargs):
context = {}
context["topics"] = Topic.objects.all()
#今月のカレンダーを表示させる。
dt = datetime.date.today()
#month_date = calendar.create_calendar(dt.year,dt.month)
month_date = calendar.create_calendar(2022,12)
print(month_date)
context["month_date"] = month_date
return render(request,"bbs/index.html",context)
def post(self, request, *args, **kwargs):
posted = Topic( comment = request.POST["comment"] )
posted.save()
return redirect("bbs:index")
index = IndexView.as_view()
テンプレート
<!DOCTYPE html>
<html lang="ja">
<head>
<meta charset="UTF-8">
<meta name="viewport" content="width=device-width,initial-scale=1">
<title>簡易掲示板</title>
<link rel="stylesheet" href="https://stackpath.bootstrapcdn.com/bootstrap/4.4.1/css/bootstrap.min.css" integrity="sha384-Vkoo8x4CGsO3+Hhxv8T/Q5PaXtkKtu6ug5TOeNV6gBiFeWPGFN9MuhOf23Q9Ifjh" crossorigin="anonymous">
<style>
.calender {
text-align:center;
font-size:1.5rem;
border:solid 0.2rem black;
/* カレンダーを中央に配置。 */
margin:0.5rem auto 0;
}
.calender td{
padding:0.5rem;
border:solid 0.1rem black;
}
.calender td:nth-child(1) {
color:crimson;
}
.calender td:nth-child(7) {
color:royalblue;
}
.calender_head {
font-weight:bold;
border-bottom:double 0.2rem black;
}
</style>
</head>
<body>
<main class="container">
<form method="POST">
{% csrf_token %}
<textarea class="form-control" name="comment"></textarea>
<input type="submit" value="送信">
</form>
<!--カレンダー-->
<table class="calender">
<thead>
<tr class="calender_head">
<td>日</td>
<td>月</td>
<td>火</td>
<td>水</td>
<td>木</td>
<td>金</td>
<td>土</td>
</tr>
</thead>
<tbody>
{% for week_date in month_date %}
<tr>
{% for date in week_date %}
<td>{{ date.day }}</td>
{% endfor %}
</tr>
{% endfor %}
</tbody>
</table>
{% for topic in topics %}
<div class="border">
{{ topic.comment }}
</div>
{% endfor %}
</main>
</body>
</html>
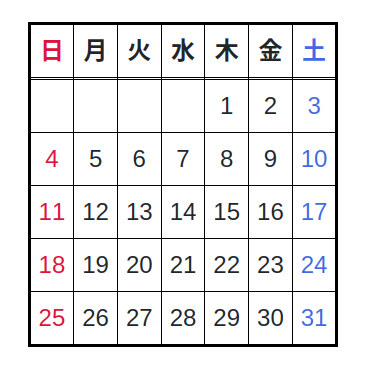
動かすとこうなる

結論
カレンダー1日分が辞書型で作られているので、必要であればキーと値を指定して追加する事ができる。