django-channelsを使ってWebSocketを実現させる【チャットサイト開発に】

django-channelsのチュートリアルに倣って、WebSocketのチャットサイトを作った。
とても実装難易度が高い。実装手順の備忘録として本記事をまとめる。
解説
ライブラリのインストール
pip install django channels daphne
djangoとdjango-channels、それからdaphne(ダフネ)をインストールする。
daphneは ASGI(Asynchronous Server Gateway Interface)に準拠したサーバー。
config/settings.py
"""
Django settings for config project.
Generated by 'django-admin startproject' using Django 5.1.4.
For more information on this file, see
https://docs.djangoproject.com/en/5.1/topics/settings/
For the full list of settings and their values, see
https://docs.djangoproject.com/en/5.1/ref/settings/
"""
from pathlib import Path
# Build paths inside the project like this: BASE_DIR / 'subdir'.
BASE_DIR = Path(__file__).resolve().parent.parent
# Quick-start development settings - unsuitable for production
# See https://docs.djangoproject.com/en/5.1/howto/deployment/checklist/
# SECURITY WARNING: keep the secret key used in production secret!
SECRET_KEY = 'django-insecure-6)asy#w-p8gyk0d&a+8s17%o0gkq9aky6(9p)4t7-d#x+&wl=e'
# SECURITY WARNING: don't run with debug turned on in production!
DEBUG = True
ALLOWED_HOSTS = []
# Application definition
INSTALLED_APPS = [
"daphne",
"chat.apps.ChatConfig",
'django.contrib.admin',
'django.contrib.auth',
'django.contrib.contenttypes',
'django.contrib.sessions',
'django.contrib.messages',
'django.contrib.staticfiles',
]
#Django-channels使用時に必ず必要。asgi.pyを読む(ここにWebSocketのルーティング設定が書かれてある。)
ASGI_APPLICATION = 'config.asgi.application'
#開発中はRedisサーバーを建てる必要はない
CHANNEL_LAYERS = {
"default": {
"BACKEND": "channels.layers.InMemoryChannelLayer"
}
}
#Radisサーバーを使用する場合はこちら
"""
CHANNEL_LAYERS = {
'default': {
'BACKEND': 'channels_redis.core.RedisChannelLayer',
'CONFIG': {
"hosts": [('127.0.0.1', 6379)],
},
},
}
"""
MIDDLEWARE = [
'django.middleware.security.SecurityMiddleware',
'django.contrib.sessions.middleware.SessionMiddleware',
'django.middleware.common.CommonMiddleware',
'django.middleware.csrf.CsrfViewMiddleware',
'django.contrib.auth.middleware.AuthenticationMiddleware',
'django.contrib.messages.middleware.MessageMiddleware',
'django.middleware.clickjacking.XFrameOptionsMiddleware',
]
ROOT_URLCONF = 'config.urls'
TEMPLATES = [
{
'BACKEND': 'django.template.backends.django.DjangoTemplates',
'DIRS': [ BASE_DIR / "templates" ],
'APP_DIRS': True,
'OPTIONS': {
'context_processors': [
'django.template.context_processors.debug',
'django.template.context_processors.request',
'django.contrib.auth.context_processors.auth',
'django.contrib.messages.context_processors.messages',
],
},
},
]
WSGI_APPLICATION = 'config.wsgi.application'
# Database
# https://docs.djangoproject.com/en/5.1/ref/settings/#databases
DATABASES = {
'default': {
'ENGINE': 'django.db.backends.sqlite3',
'NAME': BASE_DIR / 'db.sqlite3',
}
}
# Password validation
# https://docs.djangoproject.com/en/5.1/ref/settings/#auth-password-validators
AUTH_PASSWORD_VALIDATORS = [
{
'NAME': 'django.contrib.auth.password_validation.UserAttributeSimilarityValidator',
},
{
'NAME': 'django.contrib.auth.password_validation.MinimumLengthValidator',
},
{
'NAME': 'django.contrib.auth.password_validation.CommonPasswordValidator',
},
{
'NAME': 'django.contrib.auth.password_validation.NumericPasswordValidator',
},
]
# Internationalization
# https://docs.djangoproject.com/en/5.1/topics/i18n/
LANGUAGE_CODE = 'ja'
TIME_ZONE = 'Asia/Tokyo'
USE_I18N = True
USE_TZ = True
# Static files (CSS, JavaScript, Images)
# https://docs.djangoproject.com/en/5.1/howto/static-files/
STATIC_URL = 'static/'
# Default primary key field type
# https://docs.djangoproject.com/en/5.1/ref/settings/#default-auto-field
DEFAULT_AUTO_FIELD = 'django.db.models.BigAutoField'
チャンネルとは?
WebSocket接続を確立したユーザーとサーバーの経路のこと。
このチャンネルを管理し、必要に応じてグループ化しているのが、チャンネルレイヤー。
チャンネルレイヤーとは?
チャンネルレイヤーは DjangoChannels で非同期プロセス間で通信をするための仕組み。
WebSocketの接続(チャンネル)をグループ化して、1度にグループに含まれるチャンネル全てにメッセージを送ることができる。
DjangoChannelsでは、WebSocket上のやり取りは全て、チャンネルレイヤーを通して行われる。
このサンプルコードでは、
self.channel_layer.group_add(): 接続(チャンネル)をグループに追加self.channel_layer.group_discard(): 接続(チャンネル)をグループから削除self.channel_layer.group_send(): グループ(グループに所属するチャンネル全て)に対してメッセージを送る
この3つが使われている。
グループは能動的に「新規作成」、「削除」はできないようになっている。
- 存在しないグループに接続を追加するとき、自動的にグループが新規作成される
- グループに接続が1つもない場合は、自動的にグループが削除される
キャッシュサーバーとは?
キャッシュサーバーとは、データを一時的に保管しておくサーバーのことである。
例えば、DBにポーリングをしているようでは、DB(システムのディスク)に負荷がかかる上に、遅い。
そこで、ディスク内にあるデータをメモリ(RAM)に記録する。RAMであれば読み書きも高速。
ただし一般的にキャッシュサーバーは、RAM(揮発性メモリ)に記録しているため電源が切れると揮発する。
Redisとは?
Redisは、キャッシュサーバーの中でも耐障害性などに優れている。
今回、開発中にローカルメモリキャッシュを使用しているが、揮発性が高く、障害時にディスクに保存をする機能はない。
揮発したデータは取り戻せないため、Redisではディスクに保存をする設定などが用意されている。
config/urls.py
"""config URL Configuration
The `urlpatterns` list routes URLs to views. For more information please see:
https://docs.djangoproject.com/en/3.2/topics/http/urls/
Examples:
Function views
1. Add an import: from my_app import views
2. Add a URL to urlpatterns: path('', views.home, name='home')
Class-based views
1. Add an import: from other_app.views import Home
2. Add a URL to urlpatterns: path('', Home.as_view(), name='home')
Including another URLconf
1. Import the include() function: from django.urls import include, path
2. Add a URL to urlpatterns: path('blog/', include('blog.urls'))
"""
from django.contrib import admin
from django.urls import path,include
urlpatterns = [
path('admin/', admin.site.urls),
path('chat/', include("chat.urls")),
]
config/asgi.py
"""
ASGI config for config project.
It exposes the ASGI callable as a module-level variable named ``application``.
For more information on this file, see
https://docs.djangoproject.com/en/3.2/howto/deployment/asgi/
"""
"""
import os
from django.core.asgi import get_asgi_application
os.environ.setdefault('DJANGO_SETTINGS_MODULE', 'config.settings')
application = get_asgi_application()
"""
import os
from channels.auth import AuthMiddlewareStack
from channels.routing import ProtocolTypeRouter, URLRouter
from django.core.asgi import get_asgi_application
import chat.routing
os.environ.setdefault('DJANGO_SETTINGS_MODULE', 'config.settings')
application = ProtocolTypeRouter({
"http": get_asgi_application(),
# Just HTTP for now. (We can add other protocols later.)
#ここでWebSocketサーバーのルーティングを登録( ws/chat/(?P<room_name>\w+)/ でconsumersを呼び出す )
"websocket": AuthMiddlewareStack(
URLRouter(
chat.routing.websocket_urlpatterns
)
),
})
chat/views.py
from django.shortcuts import render
from django.views import View
class IndexView(View):
def get(self,request,*args,**kwargs):
return render(request,"chat/index.html")
index = IndexView.as_view()
class RoomView(View):
def get(self,request, room_name, *args,**kwargs):
context = {}
context["room_name"] = room_name
return render(request,"chat/room.html",context)
room = RoomView.as_view()
WebSocketの接続を確立させるためのページを表示している。
chat/urls.py
from django.urls import path
from . import views
app_name = "chat"
urlpatterns = [
path('', views.index, name="index"),
path('<str:room_name>/', views.room, name='room'),
]
このurls.pyはビューとだけ紐付いている、WebSocketとは直接的には関係ない。
chat/consumers.py
これがWebSocketの駆動部
# chat/consumers.py
import json
from channels.generic.websocket import AsyncWebsocketConsumer
class ChatConsumer(AsyncWebsocketConsumer):
# TIPS: このconnectメソッドは クライアント側のJavaScriptで、WebSocketクラスが実行されたときに実行される。
async def connect(self):
# TIPS: このself.scopeには、クライアント側の情報(認証状態、ユーザー情報、送信先URLなど) が含まれている。
# django-channels版 request オブジェクトのようなもの
# ただし、self.scope は辞書であり、request と違って オブジェクトではない
self.room_name = self.scope['url_route']['kwargs']['room_name']
self.room_group_name = 'chat_%s' % self.room_name
# グループに接続を追加している。
# TIPS: self.channel_layer は settings.pyで指定したチャンネルレイヤーの操作をする
# TIPS: .group_add() で 接続した人をグループに接続する。
# TIPS: この self.channel_name は接続ごとに割り当てられた一意の名前
await self.channel_layer.group_add(
self.room_group_name,
self.channel_name
)
# TIPS: self.accept() でwebsocket の接続を正式に確立する。connectメソッドで↑のグループ追加をしない場合、↓だけでも良い。
await self.accept()
# TIPS: このdisconnectはブラウザを閉じる、ページ遷移したときに発動する。
# WebSocketはステートフル。ステートレスなHTTPと違い、ブラウザ終了、ページ遷移が検知できる。
async def disconnect(self, close_code):
# TIPS: 接続をグループから削除している。
await self.channel_layer.group_discard(
self.room_group_name,
self.channel_name
)
# TIPS: クライアントからメッセージを受け取ったときの処理。
async def receive(self, text_data):
text_data_json = json.loads(text_data)
message = text_data_json['message']
# TIPS: グループに対して、メッセージを送る。グループに所属している接続ごとに、chat_messageが実行される。
# TIPS: type には、実行したいメソッドを指定する。
await self.channel_layer.group_send(
self.room_group_name,
{
'type': 'chat_message',
'message': message
}
)
# TIPS: 接続に対してメッセージを送信する処理、receiveメソッドから呼び出される。
async def chat_message(self, event):
message = event['message']
# メッセージをJSONにして送信する。(送信先のグループ はreceive で指定している。)
await self.send(text_data=json.dumps({
'message': message
}))
chat/routing.py
consumers.py のURL設定
# chat/routing.py
from django.urls import re_path
from . import consumers
# TIPS: WebSocketConsumerは.as_asgi()で呼び出せる。
# TIPS: 一致したパターンは、コンシューマーの self.scope から参照できる。
websocket_urlpatterns = [
re_path(r'ws/chat/(?P<room_name>\w+)/$', consumers.ChatConsumer.as_asgi()),
]
templates/chat/index.html
<!-- chat/templates/chat/index.html -->
<!DOCTYPE html>
<html>
<head>
<meta charset="utf-8"/>
<title>Chat Rooms</title>
</head>
<body>
What chat room would you like to enter?<br>
<input id="room-name-input" type="text" size="100"><br>
<input id="room-name-submit" type="button" value="Enter">
<script>
document.querySelector('#room-name-input').focus();
document.querySelector('#room-name-input').onkeyup = function(e) {
if (e.keyCode === 13) { // enter, return
document.querySelector('#room-name-submit').click();
}
};
document.querySelector('#room-name-submit').onclick = function(e) {
var roomName = document.querySelector('#room-name-input').value;
window.location.pathname = '/chat/' + roomName + '/';
};
</script>
</body>
</html>
トップページで、部屋名を入力しページ遷移。
遷移先のテンプレートが次の項。
templates/chat/room.html
<!-- chat/templates/chat/room.html -->
<!DOCTYPE html>
<html>
<head>
<meta charset="utf-8"/>
<title>Chat Room</title>
</head>
<body>
<textarea id="chat-log" cols="100" rows="20"></textarea><br>
<input id="chat-message-input" type="text" size="100"><br>
<input id="chat-message-submit" type="button" value="Send">
{{ room_name|json_script:"room-name" }}
<script>
const roomName = JSON.parse(document.getElementById('room-name').textContent);
// TIPS: routing.py で定義したWebSocketエンドポイントを引数に入れ、WebSocketのオブジェクトを作る。
// TIPS: consumers.py で self.accept() されると接続確立。
const chatSocket = new WebSocket(`ws://${window.location.host}/ws/chat/${roomName}/`);
// TIPS: consumers.py で self.send() されたとき(メッセージを受け取ったときに発動。)
chatSocket.onmessage = (e) => {
const data = JSON.parse(e.data);
document.querySelector('#chat-log').value += (data.message + '\n');
};
// TIPS: consumers.pyから .group_discard() で切断されたとき
chatSocket.onclose = (e) => {
console.error('Chat socket closed unexpectedly');
};
document.querySelector('#chat-message-input').focus();
document.querySelector('#chat-message-input').onkeyup = function(e) {
if (e.keyCode === 13) { // enter, return
document.querySelector('#chat-message-submit').click();
}
};
// TIPS: メッセージを送信する。WebSocket のオブジェクトから .send() 引数はJSON文字列
document.querySelector('#chat-message-submit').onclick = (e) => {
const messageInputDom = document.querySelector('#chat-message-input');
const message = messageInputDom.value;
chatSocket.send(JSON.stringify({ 'message': message }));
messageInputDom.value = '';
};
</script>
</body>
</html>
WebSocket クラスを使って接続を確立する。このときの引数には、routing.pyで取り決めたURLを指定し、コンシューマーを呼び出す。
コンシューマーは接続を了承。チャットの投稿ができるようになる。
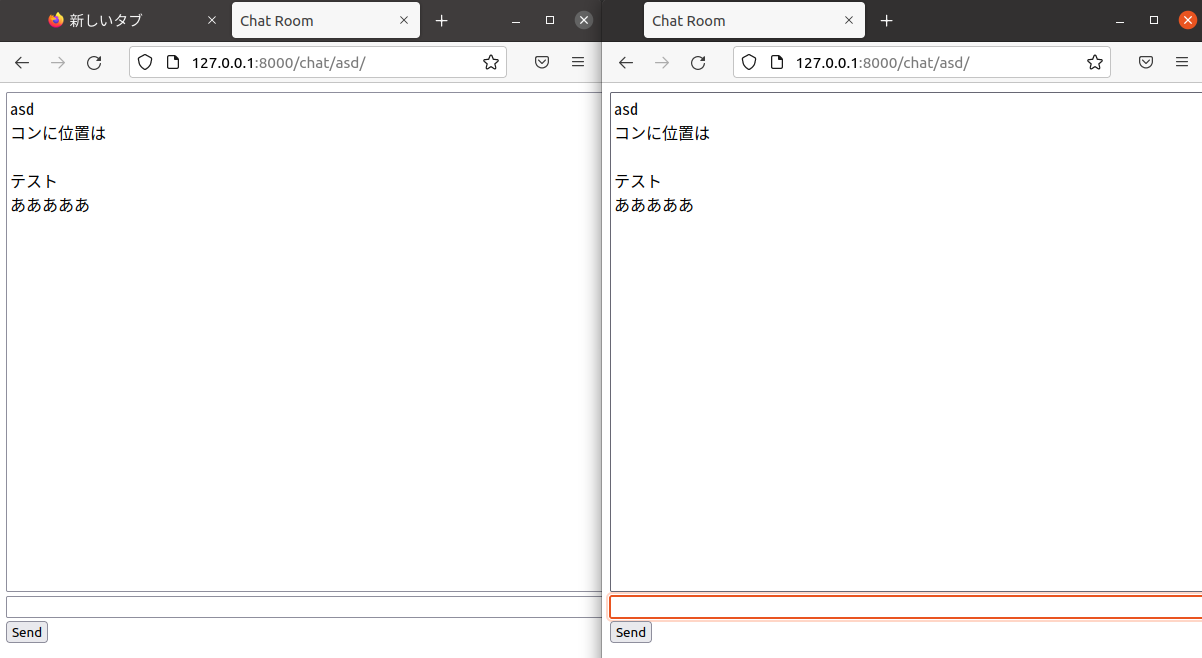
動かすとこうなる。
ROOMを作り、コメントを投稿することでそれが全てに反映される。

結論
まとめるとこうなる。
- WebSocketとはプロトコルのことである、HTTPと違いステートフルで、接続状況を管理できる
- DjangoでWebSocketを簡易に実現させるために、django_channels がある
- django_channels では、チャンネルレイヤーという仕組みを使って、接続をグループで管理することができる
self.channel_layerのメソッドを使って、接続をグループ追加、接続をグループから削除、グループにメッセージを送信することができる- サイトの全機能をWebSocketで実現すると、コードが非常に複雑になる。部分的に導入が定石
このように、要求される前提知識は非常に多い。
もし難しいと感じる場合は、一旦SSE(ServerSentEvents)を使ったリアルタイム通信機能も確認すると良いだろう。
DjangoでServerSentEvents(SSE)とローカルキャッシュを使い、リアルタイムでDB内の情報を表示する
このSSEも、JavaScriptでSSEストリームを受取するようサーバーに要求し、以降Django側から返されるメッセージをもとにレンダリングをしている。
これらWebSocketやSSEに、Reactを追加してSPAにするには、メッセージ受信時にStateを書き換えすれば良い。
ソースコード
一部は公式チュートリアルから改変し、私のブログ内で解説している書き方に倣っている。(ビュークラスを使用する、設定ディレクトリをconfigにする等)
https://github.com/seiya0723/django-channels-websocket-sample
このコードは、ページをリロードするとチャットの内容が全て消える。そこで、下記では、投稿内容を全てDBに記録するようにした。